Friday, September 20, 2013

Pretty Little Chair

This was a smaller project that was fun to do.  We acquired this chair in its skeletal state, but I was immediately drawn to it because my grandmother had one just like it.  Dave fixed the top half of the chair and I worked on upholstering it.  Here is the chair before it was upholstered.


I staple gunned some burlap over the springs, and then put some batting over it.

 I covered it with a linen fabric and added a pleated skirt.


This cute little chair is sold.  Please email davewhit4@gmail.com with any interest.   Thank you and keep checking us out.  I am adding items weekly.


Monday, September 16, 2013

Our First Chalk Paint Project

As My husband and I have gotten more involved in redoing furniture, I have seen the already risen trend of Annie Sloan chalk paint.  I was drawn in mostly by the wonderful colors, but as I read more about chalk paint I realized that the paint was also a time saver.  I consider a time saver as a money saver, so the price of the chalk paint bothered me less. So, at my sisters request and my own intrigue we embarked on our newest furniture expedition.  For those of you who know about Annie Sloan chalk paint, I must tell you that this is as basic as it gets.

1.  Start with an interesting and fixed piece of furniture.  Wipe down the furniture so there is no dust or debris on it.  Do nothing else :)

2.  Take out the drawers and paint the faces of each drawer.  Use a decent paint brush.

3.  Paint the drawer less dresser.  The first coat of paint doesn't look like it covers very well until the paint dries.  The first picture is a closeup of what the first coat of paint looks like.  the picture of the whole dresser is the dresser with two coats.


4.  After the paint is dry, I used a Q-tip to apply stain into the ornamental pieces and pulls of the dresser.  The picture also shows some of the distressing I did after the stain was dry.


5.  I sandpaper distressed the edges and ornamental pieces of the dresser.  I touched up any problem areas with more paint.  I also brushed some paint over the stained pulls to give them more depth and character.

6.  We Polyurethaned the whole thing.  No I didn't wax!!  The polyurethane gave the paint a darker look and it looked great.  

The dresser besides looking great is a well made piece with four easy to pull out drawers.  The top two drawers have built in dividers.  The dresser measures 35" wide, 20" deep and 48" tall in the front.  The lip on the back makes it 49 1/4" tall.   Please contact us with any interest at davewhit4@gmail.com


Saturday, September 14, 2013

Some Oldies but Goodies!

We no longer have these pieces with us, but I wanted to put up examples of furniture my husband and I have done in the past.

We restored the white tall dresser because it was missing a door and a drawer. My husband made a new door and drawer, and we painted it a shabby chic white. We stamped the drawers a dark brown to match the dark hardware for a wow factor.


We painted this antique Taylor made desk a dark pottery barn blue and gold stamped the top to match the original brass bail pulls.


Friday, September 13, 2013

An Easy Table Makeover!

We acquired this table in a sad state.  The legs had to be fixed and the many scratches and dents fixed and filled.  My husband who is a furniture genius, was able to fix the legs, sand out the scratches and fill the dents.  It was then my job to bring new style to this antique table.  I am writing the following steps, but I didn't get any pictures to go with the tutorial.  I am sure I can find another table to redo and I will post those pictures.  For now, here are the following steps in the table makeover:
1.  Sand/strip the table top.  The table top needs to be completely sanded down so it can be re-stained.
2.  Take the legs off and sand.  The legs on most tables can be unscrewed from the table top.  After you remove them the legs are easier to work with.
3.  Sand the legs.  The legs need to be sanded just enough to make the new paint stick.
4.  Paint the legs.  Paint the legs of the table (I used regular indoor latex paint).  Let the paint dry.  Sand the painted legs slightly with 220 grain sandpaper.  Paint the legs with a second coat.
5.  Paint the bottom edge of the table top the same color as the legs.  Let the paint dry. Sand the edge.  paint the edge with a second coat.
6.  Stain the table top with a rag and the stain color of your choice.  We used a mahogany stain, because the table is mahogany.
7.  Stain the bottom edge of the table top and the legs of the table over the paint.  Use a brush to stain the edge and legs. Wipe off the excess stain immediately.  This gives the paint a washed look and adds depth.  Let the stain dry.
8.  Sand the edges and curves so the wood shows through.
9.  Polyurethane the whole table with a brush.  The bottom edge and legs only need one coat of polyurethane.  Allow the polyurethane to dry
10.  Sand the table top lightly. Polyurethane the table top again.
11.  Attach the legs to the table.  And you are finished.

This table is sold.  Please contact us by email if you are interested in similar pieces at davewhit4@gmail.com


Thursday, September 12, 2013

Its not as hard as others make it seem!


1.  Start with a well made piece of furniture that has a great shape.  These matching side tables and coffee table were screaming to be freed from their outdated shell!


2.  Remove the hardware.  We removed the hardware and put them in their own jar so they would not get lost (it has happened to me before ).

3.   Sand all the pieces.  My eight year old son and I got the honored job of sanding the pieces down.  We went a little overboard with the power sanders, but the job got done.  My husband says we just needed to sand the surface layer so the paint sticks, but I like to be thorough.
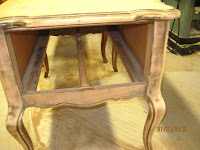
sanded


4.  Rub everything down with tack cloth.  After sanding, we rubbed all the pieces down with a tack cloth.  You can purchase the tack cloth at a Lowe's or Home Depot.This is to get all the dust off so the paint goes on smooth.  Make sure you get all the nooks and crannies ( I am channeling my mother with that phrase ).


 5.  Paint.  We purchased a paint sprayer for these kind of jobs, but you can paint by hand also. Sanding is priming, and you do not need to paint with a primer.  I put the pieces up on plastic buckets so they would not get debris from the ground on the paint.


6.  Sand again.  I gave the furniture at least 12 hours to dry before I sanded it lightly with 220 grain sandpaper.

7.  Paint again.  Spray or brush on another coat of the same paint color.  Let the paint dry.  I helped the drying process by putting a fan in front of it.


8.  This is an optional step.  You can sand and paint the piece one last time.  I did for the side tables, but not the coffee table.  The coffee table looks just as great, so the side tables probably didn't need a third coat.  I purposely did this to see if the third coat made a difference and it didn't.  I brushed on the last coat of paint and didn't use the sprayer because I was running out of paint and the sprayer was splattering instead of coating evenly.

9.  Distress the edges.  I used 220 grain sandpaper again on an electric sander to evenly sand the edges down to the wood grain.  I had to hand sand the edges that the sander had a hard time getting to.


10.  Stain the edges.  Stain the edges with a stain pen or with stain on a Q-tip.  Wipe off the excess stain.

11.  Wax.  This is much harder than I thought.  We used clear wax and some cheesecloth.  We put a very thin layer of wax on the whole piece and let it dry for at least 15 minutes.  We buffed it off with an electric buffer, which didn't seem to work very well.  We then buffed it with an old clean t-shirt by hand.  My husband was much better at this simply because he has a lot more upper body strength.  This means start lifting your weights or waxing isn't going to be your friend.

12.  Put the hardware back on.   Here are some pictures of the finished set.


Please contact davewhit3@gmail.com if you are interested in pieces like these.