Monday, September 30, 2013

A Trunk Chair

My husband loves antique trunks.  He has restored many trunks, so when we purchased another trunk we thought we would probably be heading down the same road.  In an effort to find some new ideas for this old trunk, I came across some trunks that were made into chairs.  We decided to accept this new challenge and make something very unique.

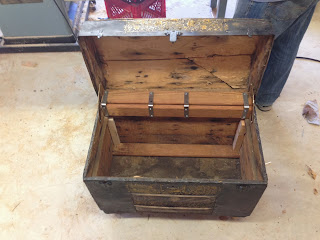
We started by taking off the metal ornaments and clamps. We sanded down the wood and metal sides with 60 grit sandpaper. Here is the trunk before we started the big change but already sanded down:


My husband added wooden support to the bottom of the trunk so he could add legs.  He screwed the leg hardware onto the bottom of the trunk.  He added wooden braces, metal brackets, and trunk stays to keep the lid open and secure.


He also cut two wooden boards to size so he could attach them after I upholstered them.  He put two wooden slats on the bottom board so it fit snugly into place.


We taped off the parts of the trunk we didn't want to paint and painted the metal with Rust-oleum  silver spray paint.  We distressed it by sanding the edges down to the black paint and washing it with watered down black paint.  We also black washed the clamps and ornaments.  Washing it means to paint it with watered down paint, and wipe it down with a clean rag so the paint sticks in the low areas.
We stained and Polyurethaned  the wood and the legs and attached the ornaments and clamps.  


I cut 2 inch foam to the size of the board, but I left the foam about an inch shorter than the boards so there was room for the two boards to fit together.  I fit the foam to the board and covered them with batting.  I stapled the batting in place on the underside of the board.  I fit the fabric over the boards and stapled the fabric neatly into place because the bottom board was going to be seen when removed for storage.  I measured the placement for the tufting and marked the spots with chalk.  I staple gunned the tufts into place and nailed a black nailhead over the staple. We also covered the bracketed wood boards with batting and stapled fabric in place on top and on bottom.


We nailed the top upholstered back into place using nails that were painted the same color as the metal. The bottom cushion fit into place and we were all done.


This Beautiful and super sturdy trunk chair is sold.  We do have another trunk we can make into a chair so please e-mail us at davewhit4@gmail.com if you have any interest.  Thank You and keep checking back for more furniture.  


Thursday, September 26, 2013

A Quick Project All Natural

We once again found a great piece on-line.  A beautiful antique church pew!  Dave had to fix one of the sides and reinforce the seat, but once again he made it sturdy and wonderful.  Here is a before picture.

I once again had to pull out the power sander to sand down some of the darker spots.  I sanded the seat very well with the sander and then sanded the hard to reach spots with 80 grain sandpaper.


We then wiped the whole pew down with a cloth to get all the dust off.  We wanted to leave the beautiful wood as it was so my husband wiped the pew down with restoring oil we bought at Lowe's. He let the oil soak in for thirty minutes and wiped down the pew again with a clean cloth. Here is the end result.


 The pew sold.   If you are interested in a piece like it please email us at davewhit4@gmail.com.  


Tuesday, September 24, 2013

A Custom Job!!

We were contacted by a local wedding business called Lucky in Love ( www.luckyinlovesa.com) about our furniture.  I was excited I was getting our name out there and she was excited to get something new for her inventory.  We had purchased a vanity at the same time as the dresser (see chalk paint post) and she wanted a distressed off-white look.


I started by removing the mirror and sanding the whole thing with 80 grain sandpaper.


We took out all the drawers, and put the vanity on a tarp inside.  We spray painted the vanity an antique white color with our Wagner paint sprayer .  We also sprayed the drawers separately.  These are pictures of the first coat.  Some of the stains came through so we had to sand those areas down well.


We waited for it to dry and I painted the vanity and drawers with a second coat.

I covered the mirror with paper (poster board would have been better) before I painted it.  I used a paint brush to paint the mirror.

I distressed the edges and wooden ornaments with 120 grain sand paper.

We Polyurethaned the whole vanity for a durable finish.


I loved how this dresser looked at the end, and I hope it is a great addition to the Lucky in Love San Antonio business.

For any interest in pieces like this, please contact us at davewhit4@gmail.com 


Saturday, September 21, 2013

A Re-Purposed Antique Bed

We had another first at Martineau Furniture!  We usually repair and re-finish our bigger furniture, but with the antique bed we had to totally re-purpose.  We were trying to decide what to do with this bed because the headboard was warped and the wood had some glue mishaps, and my wonderfully talented, sweet daughter walked in and said" We should make it into a bench".  She must have fabulous genes because I thought this was a great idea.  So my husband came up with the plan and I worked on the style.  This is a before picture (very fuzzy, because although a furniture genius, my husband is not a great picture taker).
I will skip the steps on how Dave made this into a bench, because this would be a very long post.  He cut, drilled, glued, clamped, and puttied. It turned out wonderfully. The slats are just for show, we put a solid wood base on later.


We sanded the whole bench.  I sanded with 80 grit sandpaper, just enough for the paint to stick.


We spray painted the whole bench black with our handy paint sprayer.  The picture is of just the black paint with out the poly on it.  I put the bench on it to see what it would look like.  I then upholstered the wooden seat by layering batting on top and staple gunning it in place.  I wrapped the fabric around the seat and staple gunned it to the underside of the wood.  I measured out and marked the place for the "tufts".  I hammered nail-heads into my marked spots.


We painted the bottom wood piece black to match the bench.  This was something we should have done before I upholstered, so now you can learn from my mistake.
We Polyurethaned the bench with a satin Poly.  We attached the upholstered seat to the bench with metal L brackets and it was done.


Please email davewhit4@gmail.com with any interest.