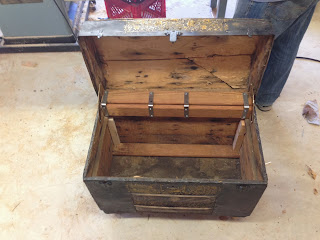
We started by taking off the metal ornaments and clamps. We sanded down the wood and metal sides with 60 grit sandpaper. Here is the trunk before we started the big change but already sanded down:

My husband added wooden support to the bottom of the trunk so he could add legs. He screwed the leg hardware onto the bottom of the trunk. He added wooden braces, metal brackets, and trunk stays to keep the lid open and secure.
He also cut two wooden boards to size so he could attach them after I upholstered them. He put two wooden slats on the bottom board so it fit snugly into place.

We taped off the parts of the trunk we didn't want to paint and painted the metal with Rust-oleum silver spray paint. We distressed it by sanding the edges down to the black paint and washing it with watered down black paint. We also black washed the clamps and ornaments. Washing it means to paint it with watered down paint, and wipe it down with a clean rag so the paint sticks in the low areas.
We stained and Polyurethaned the wood and the legs and attached the ornaments and clamps.


I cut 2 inch foam to the size of the board, but I left the foam about an inch shorter than the boards so there was room for the two boards to fit together. I fit the foam to the board and covered them with batting. I stapled the batting in place on the underside of the board. I fit the fabric over the boards and stapled the fabric neatly into place because the bottom board was going to be seen when removed for storage. I measured the placement for the tufting and marked the spots with chalk. I staple gunned the tufts into place and nailed a black nailhead over the staple. We also covered the bracketed wood boards with batting and stapled fabric in place on top and on bottom.


We nailed the top upholstered back into place using nails that were painted the same color as the metal. The bottom cushion fit into place and we were all done.


This Beautiful and super sturdy trunk chair is sold. We do have another trunk we can make into a chair so please e-mail us at davewhit4@gmail.com if you have any interest. Thank You and keep checking back for more furniture.


No comments:
Post a Comment